Gone But Not Forgotten

by D.V. Jennings
While my mother was alive, she would take me to the local cemeteries on days with pleasant weather. She taught me that cemeteries were places that not only told the personal history of the people within, but also the history of the area that grew around it. A cemetery tells its story through the grave markers left behind. It serves as an outdoor museum to a city’s way of life, and one great way to preserve that history is to preserve its art, even if the art is in the cemetery.

I have always been interested in cleaning grave markers. I feel cleaning a stone is a way to show respect and preserve the past. I volunteered at Oakland Cemetery in Dallas in March 2021 to help revitalize this important burial ground under the guidance of volunteer leaders and Oakland Cemetery Lot Owners Association board members Monica Newbury and Tom White. Under their supervision and guidance, I was taught how to professionally clean stones and I am now allowed to clean markers at the cemetery. If you are not cleaning your own family’s markers, it is paramount you receive permission from the cemetery or living relatives of the deceased.
At Oakland Cemetery we take a very conservative and gentle approach to cleaning grave markers. The safest option is the best option. The cardinal rules of cleaning stones are:
- Never use anything metal to clean a stone;
- Do not use anything abrasive such as grinders or resurfacing tools;
- Do not use household cleaning products even if they are advertised as safe to use on granite or marble; and
- Avoid using anything with dyes, since the dye could leech and stain the stone.
For your safety and the stone, do not attempt to clean a stone that is already visibly damaged or leaning. Once you have selected a stone, be sure to keep the stone wet while cleaning it, so that there is less chance of harming the material. When cleaning, only use plastic paint/putty scrapers, natural or soft plastic-bristled brushes, and clean water. As a cleaning agent, volunteers at Oakland Cemetery only use a product called D/2 Biological Solution. It’s a biodegradable product designed to remove stains without damaging the original stone.
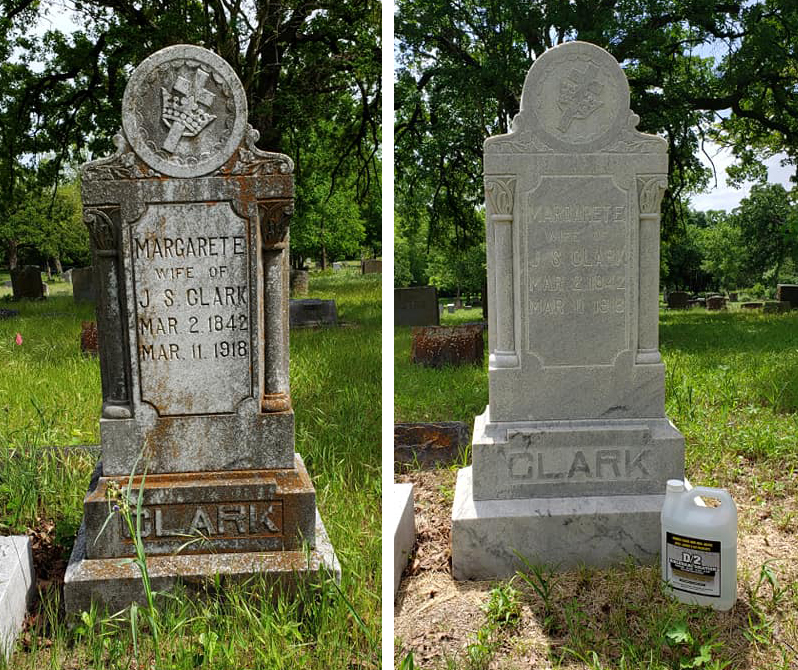
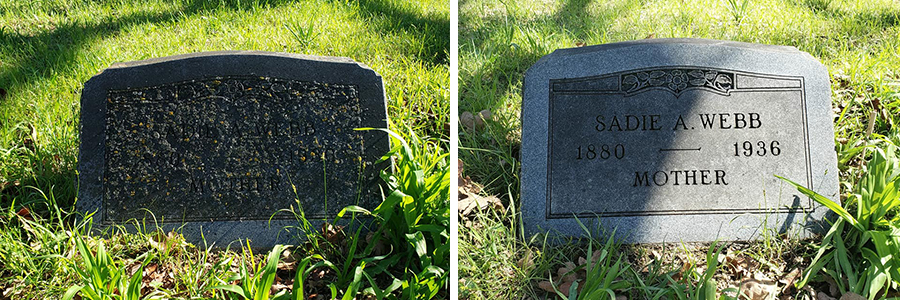
The goal of cleaning gravestones is not to get it looking “good as new,” but to remove surface grime and make them legible; especially if it is an older stone. The most important reason for this expectation is that too much abrasive cleaning damages the stone. Just as we have skin, rocks have their own surface biome that protects them from erosion and injury. When harsh chemicals or surfacing tools are used, the stone is damaged and may make preservation impossible. D/2 is a solution that is safe for the biome of most types of stone such as marble, granite, limestone, and concrete. D/2 also works over the course of weeks to continue cleaning the stone as it pulls impurities out of the stone as it penetrates. So, good things come to those who wait!
As you prepare to clean stones, I always recommend that you are aware of your surroundings. Look out for uneven and/or sunken ground, wildlife, insects such as ants and wasps, and try to avoid plants such as poison ivy. Cleaning stones when the weather is mild, such as in autumn or spring, leads to better results and is generally safer than during the extremes of winter and summer.

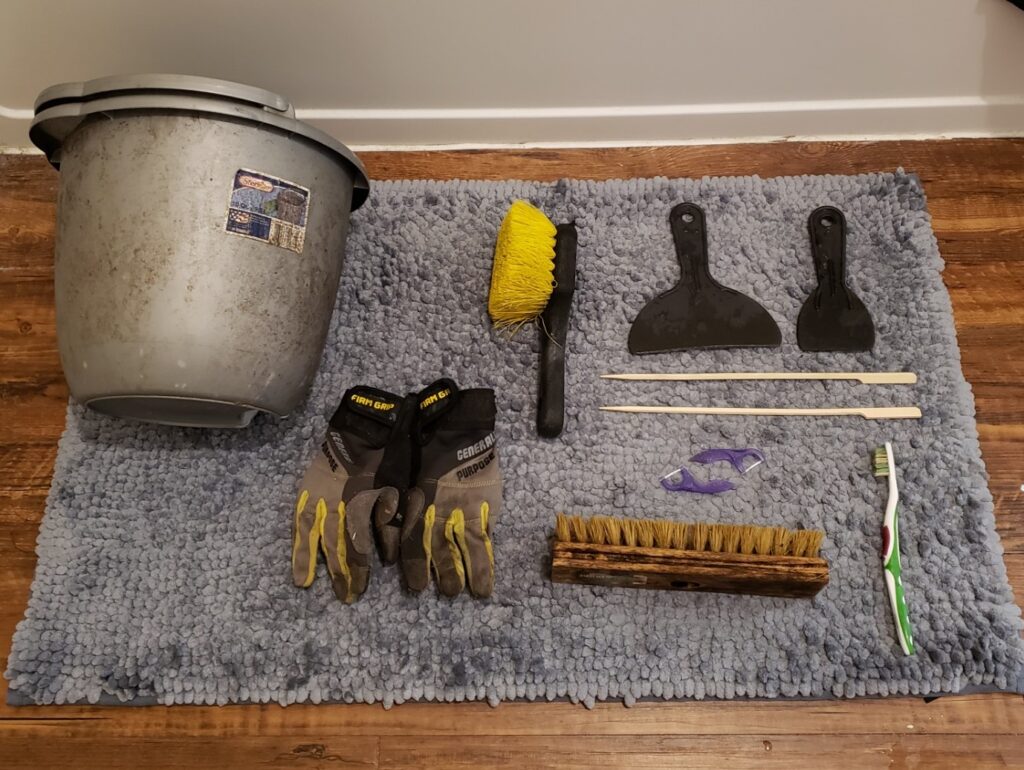
Your basic “cleaning kit” should include work gloves, one or more plastic paint or putty scrapers in varying sizes, at least one gallon of clean water, a natural and soft plastic-bristled brush, dry towels, and D/2. For detailed cleaning in etchings and small linework, I recommend using tools like a soft bristled toothbrush, wooden skewers, and plastic dental floss picks.
There are a few ways to clean a stone and they can vary based on how dirty the stone is and how much time you have. If you’re short on time and have D/2 available: use a sprayer to thoroughly coat the stone in D/2 and walk away. As previously stated, it will take time, but the D/2 will work. Some stones just need to be sprayed down with clean water and a gentle scrub to look lovely and some need a more exhaustive treatment that can be done in stages. Any way you prefer to clean a stone, always end with a spray of D/2 to maintain and promote the stone’s condition.

(2) Same marker 2 months later after D/2 has been allowed to do its work over time.
The longer process is a multi-step method that was introduced to me by Monica Newbury and Tom White, who have attended preservation workshops and have experience in cleaning stones. First, make sure to completely wet the stone and keep it wet during the whole cleaning process. To do this I use two pump sprayer I picked up at the hardware store – one filled with water and a separate one to apply D/2. If the stone has vegetation or growth on it such as lichens, remove it gently with the plastic scraper. This step can also remove some of the built-up dirt and grime before gently scrubbing the stone with your brushes and then thoroughly rinsing with clean water.
At this point, apply D/2 if needed and let it sit for 10 to 15 minutes so that it can penetrate the stone and loosen up the layers of pollution and dirt. While this is happening, I like to start on or look for another stone to occupy my time. After the 10-15 minute wait, use your brushes again to clean the stone in a circular motion. You may notice on stones such as white marble that they will start to streak red or brown. Do not worry, this is a common occurrence as the D/2 pulls minerals and dirt out of the stone and in time will fade out. If there is any fine detailing or lettering on the stone, now would be a good time to use the toothbrush, flossers, or skewers. Once you are satisfied with the result, completely rinse the stone with clean water until it runs clear off the stone.
The last step is to either let the stone dry naturally or pat dry with clean towels or soft cloths. After you are sure the stone is completely dry, you should apply one more “wet it and forget it” layer of D/2. This treatment will continue to penetrate and clean the stone for weeks, yielding remarkable results. It is a waiting game but definitely worth it.

(2) Carter memorial immediately after cleaning with D/2, causing the red streaking mentioned in the text.
(3) Carter memorial in June of 2021, 2 months after initial D/2 cleaning.
All of my training has been on site and by workshop. If you would like more information on cleaning grave markers, please visit the following useful sources on cleaning techniques, workshops, and supplies:
Image credits:
All photos by DV Jennings, used with permission.

